Mixed Reality on Meta Quest 3
I’ve been diving into Mixed Reality (MR) recently, and I wanted to experiment with a simple Passthrough prototype on my Meta Quest 3. The goal was simple but oddly satisfying: see my real room through the headset, spawn virtual balls, and watch them bounce off walls and floors. Honestly, it felt a bit like playing catch with my own furniture. This post is my personal developer log — not a polished tutorial. I’ll walk through what I did, why I did it, what broke (and it did), and what I learned along the way.
Understanding the Basics
Before jumping into Unity, I clarified the essential concepts.
- Mixed Reality (MR): blends virtual content with the real world.
- Extended Reality (XR): umbrella term for VR, AR, and MR.
- Passthrough: lets you see the real world through the Quest’s cameras, layered with virtual objects.
💡Why this matters: MR is not just “turn on a camera.” Understanding this early saves time when configuring cameras, layers, and interactions in Unity.
Tools
- Unity: v.2020.3+
- Meta Quest 3
- USB-c Cable (for Building)
- Oculus Integration Package from Unity Asset Store
I used 2020.3.1f Unity version. Passthrough and OVRManager behaves slightly differently depending on Unity version. Specifying this ensures anyone trying to replicate my steps hits the same quirks and solutions I did.
Step-by-Step Tutorials
Setup
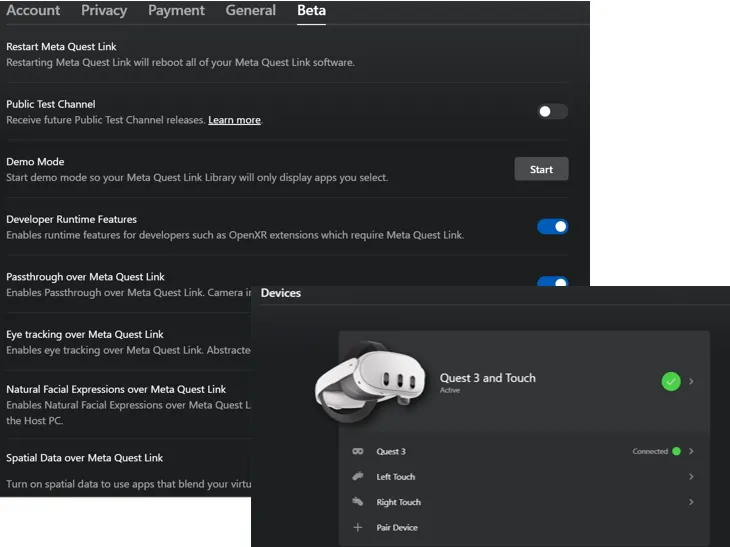
1. Enable Developer Mode
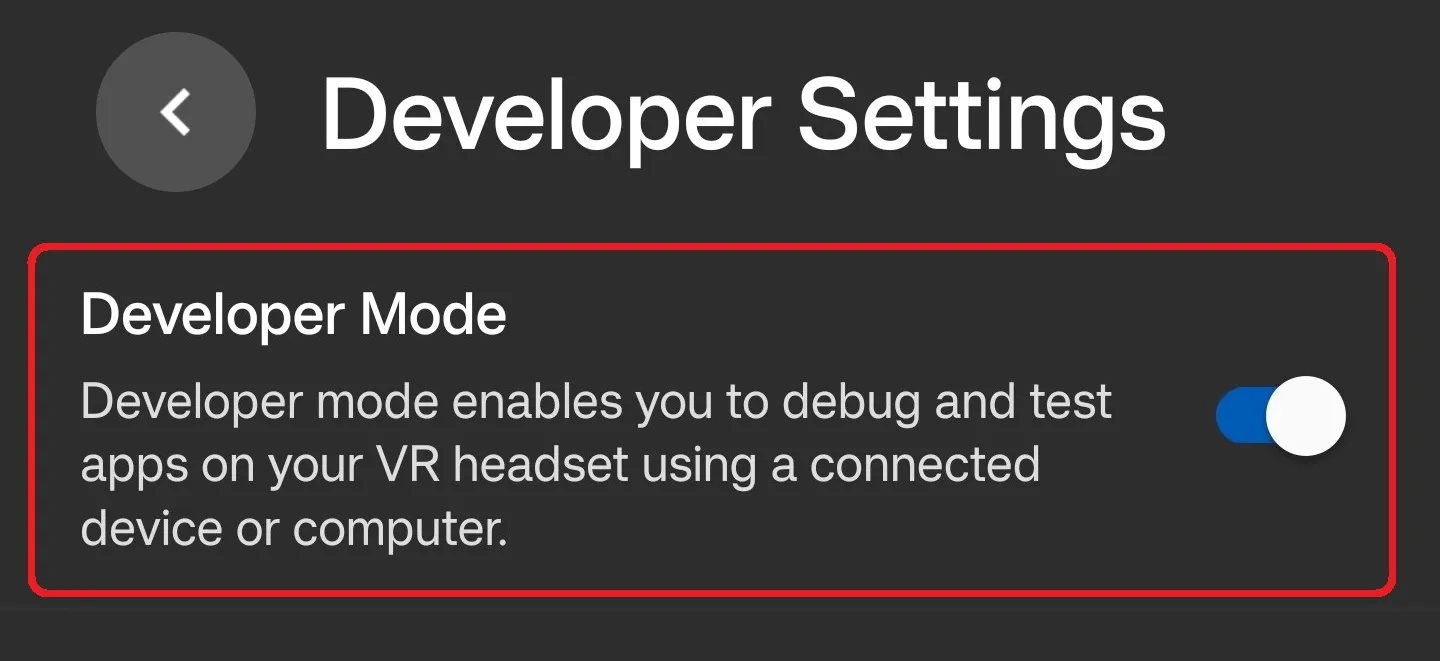
- Create a Meta Developer Account in Meta.
- Turn on Developer Mode in the Meta Horizon app
2. Setting Up Unity for Oculus Development
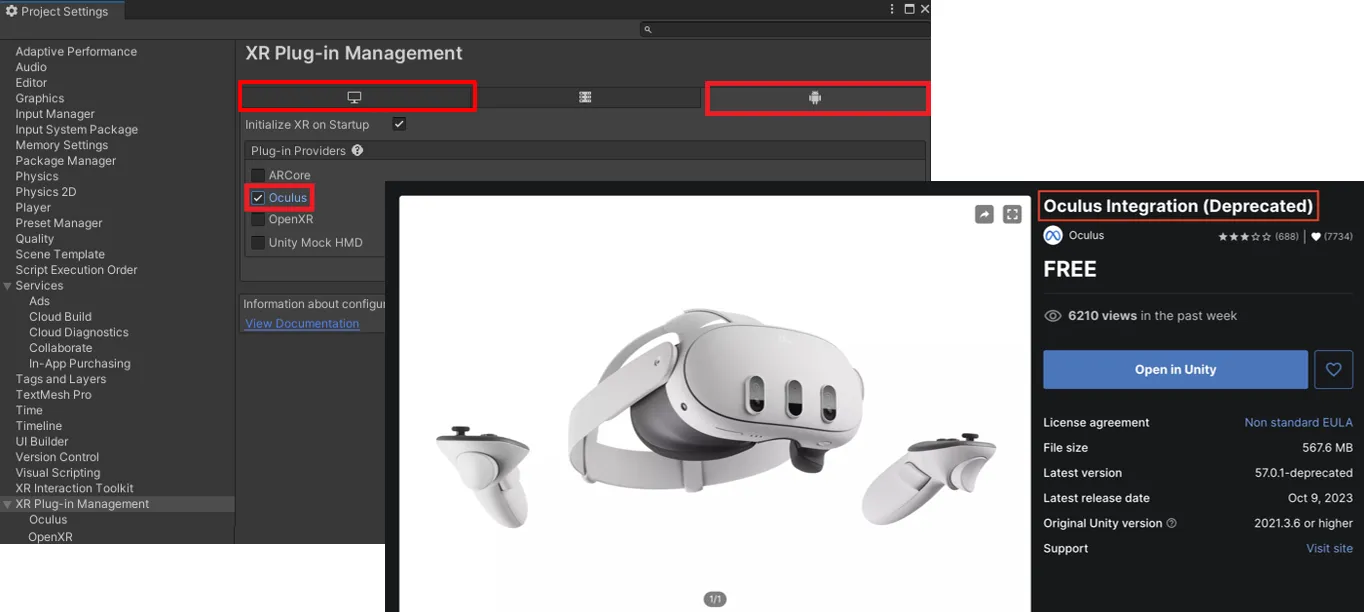
- Go to
Edit → Project Settings → XR Plug-in Management, enable Oculus for both Windows and Android. - Install Oculus Integration from the Unity Asset Store.
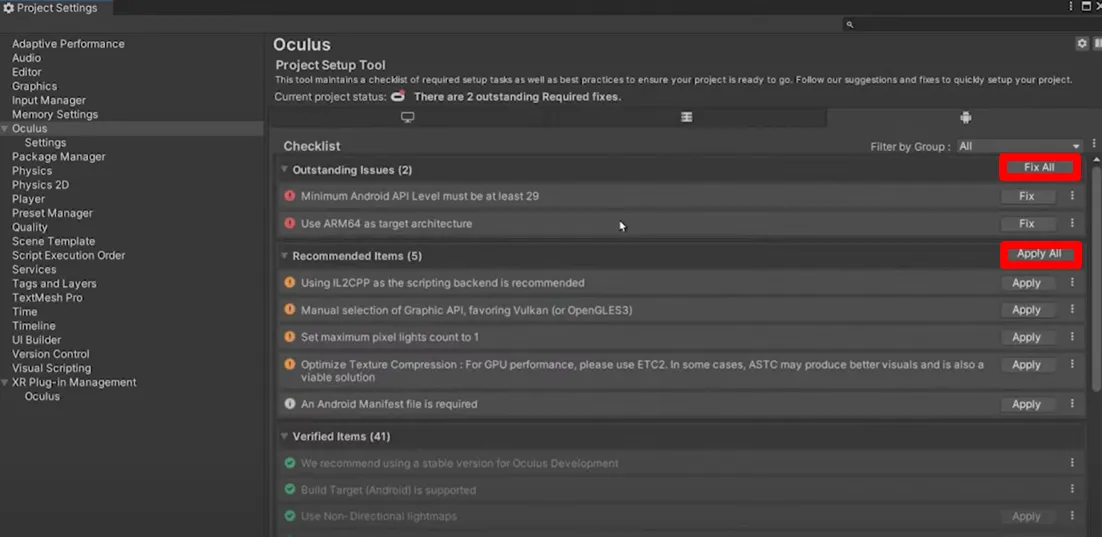
- Run
Tools → Project Setup Tool → Fix All & Apply All(this actually fixed more problems than I expected).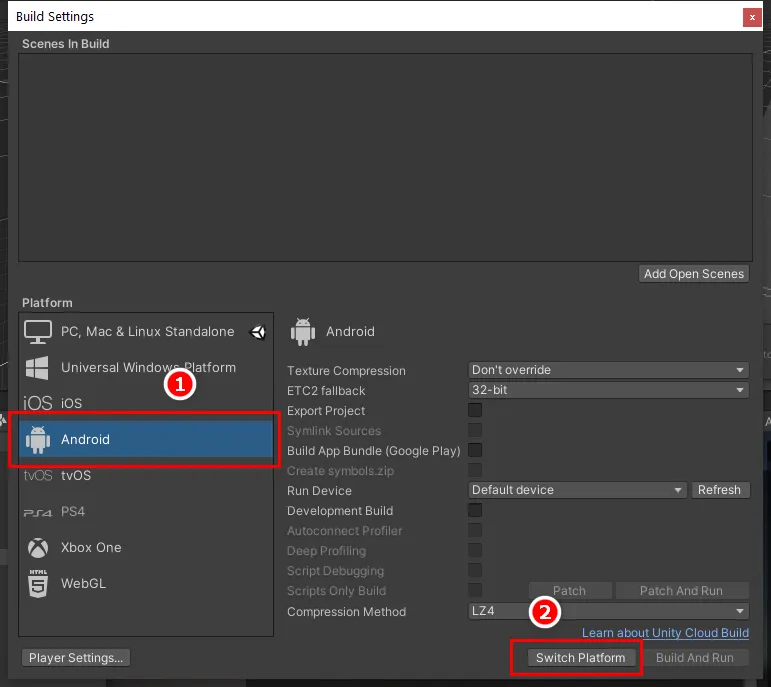
- Switch platform in
File → Build Settings → Android.
💡 Why: Quest 3 runs Android. Without the XR plugin + Oculus package, Unity can’t talk to the headset — I learned this the hard way when nothing showed up in my first test build.
Connecting the Headset & Building
Method 1: AirLink (Wireless)
convenient, but slightly blurry visuals and longer builds — kind of frustrating when you’re in the zone
- Turn on Developer settings in Quest (Settings → Beta)
- Connect Quest to PC via AirLink
- Run from Unity. (May cause longer load times)
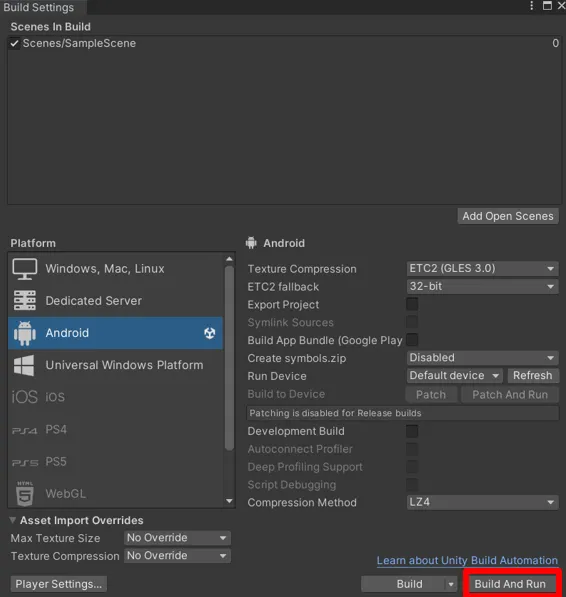
Method 2 (Recommended): USB-C (Wired)
more stable, faster builds
- Connect Quest via USB-C cable
- In Unity, go to
files → build settingsand click Build and Run.
Passthrough
1. Camera Configuration
- Delete the default
Main Camera. - Add
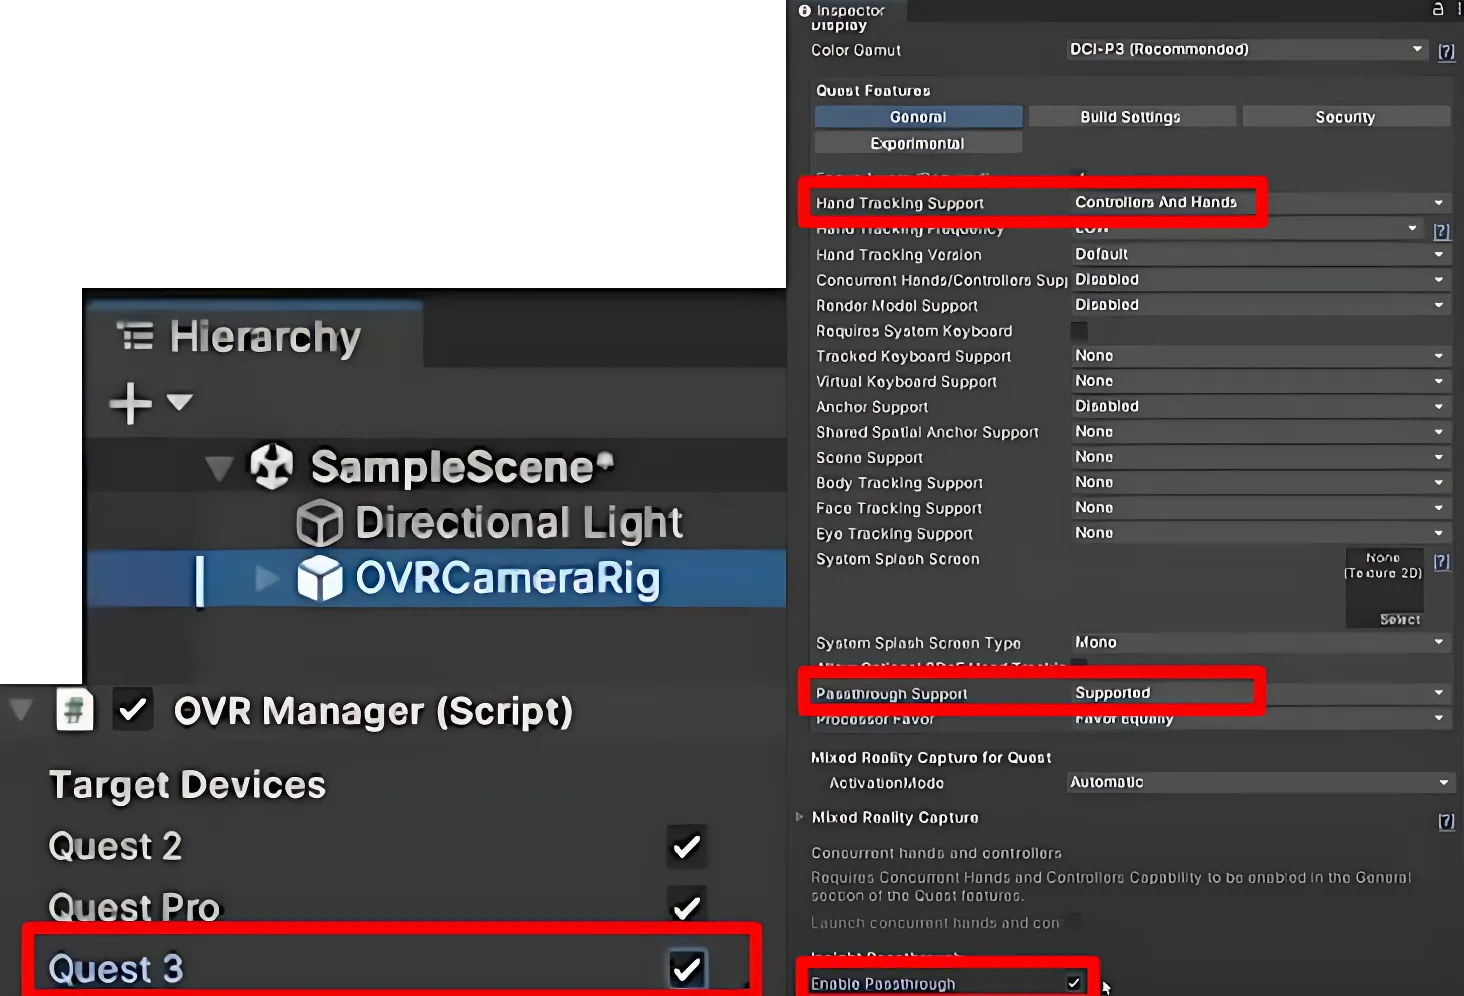
OVRCameraRigprefab. - In
OVRManager(inside OVRCameraRig), set:- Hand Tracking Support → “Controllers and Hands”
- Passthrough Support → “Supported”
- Enable Passthrough → Checked
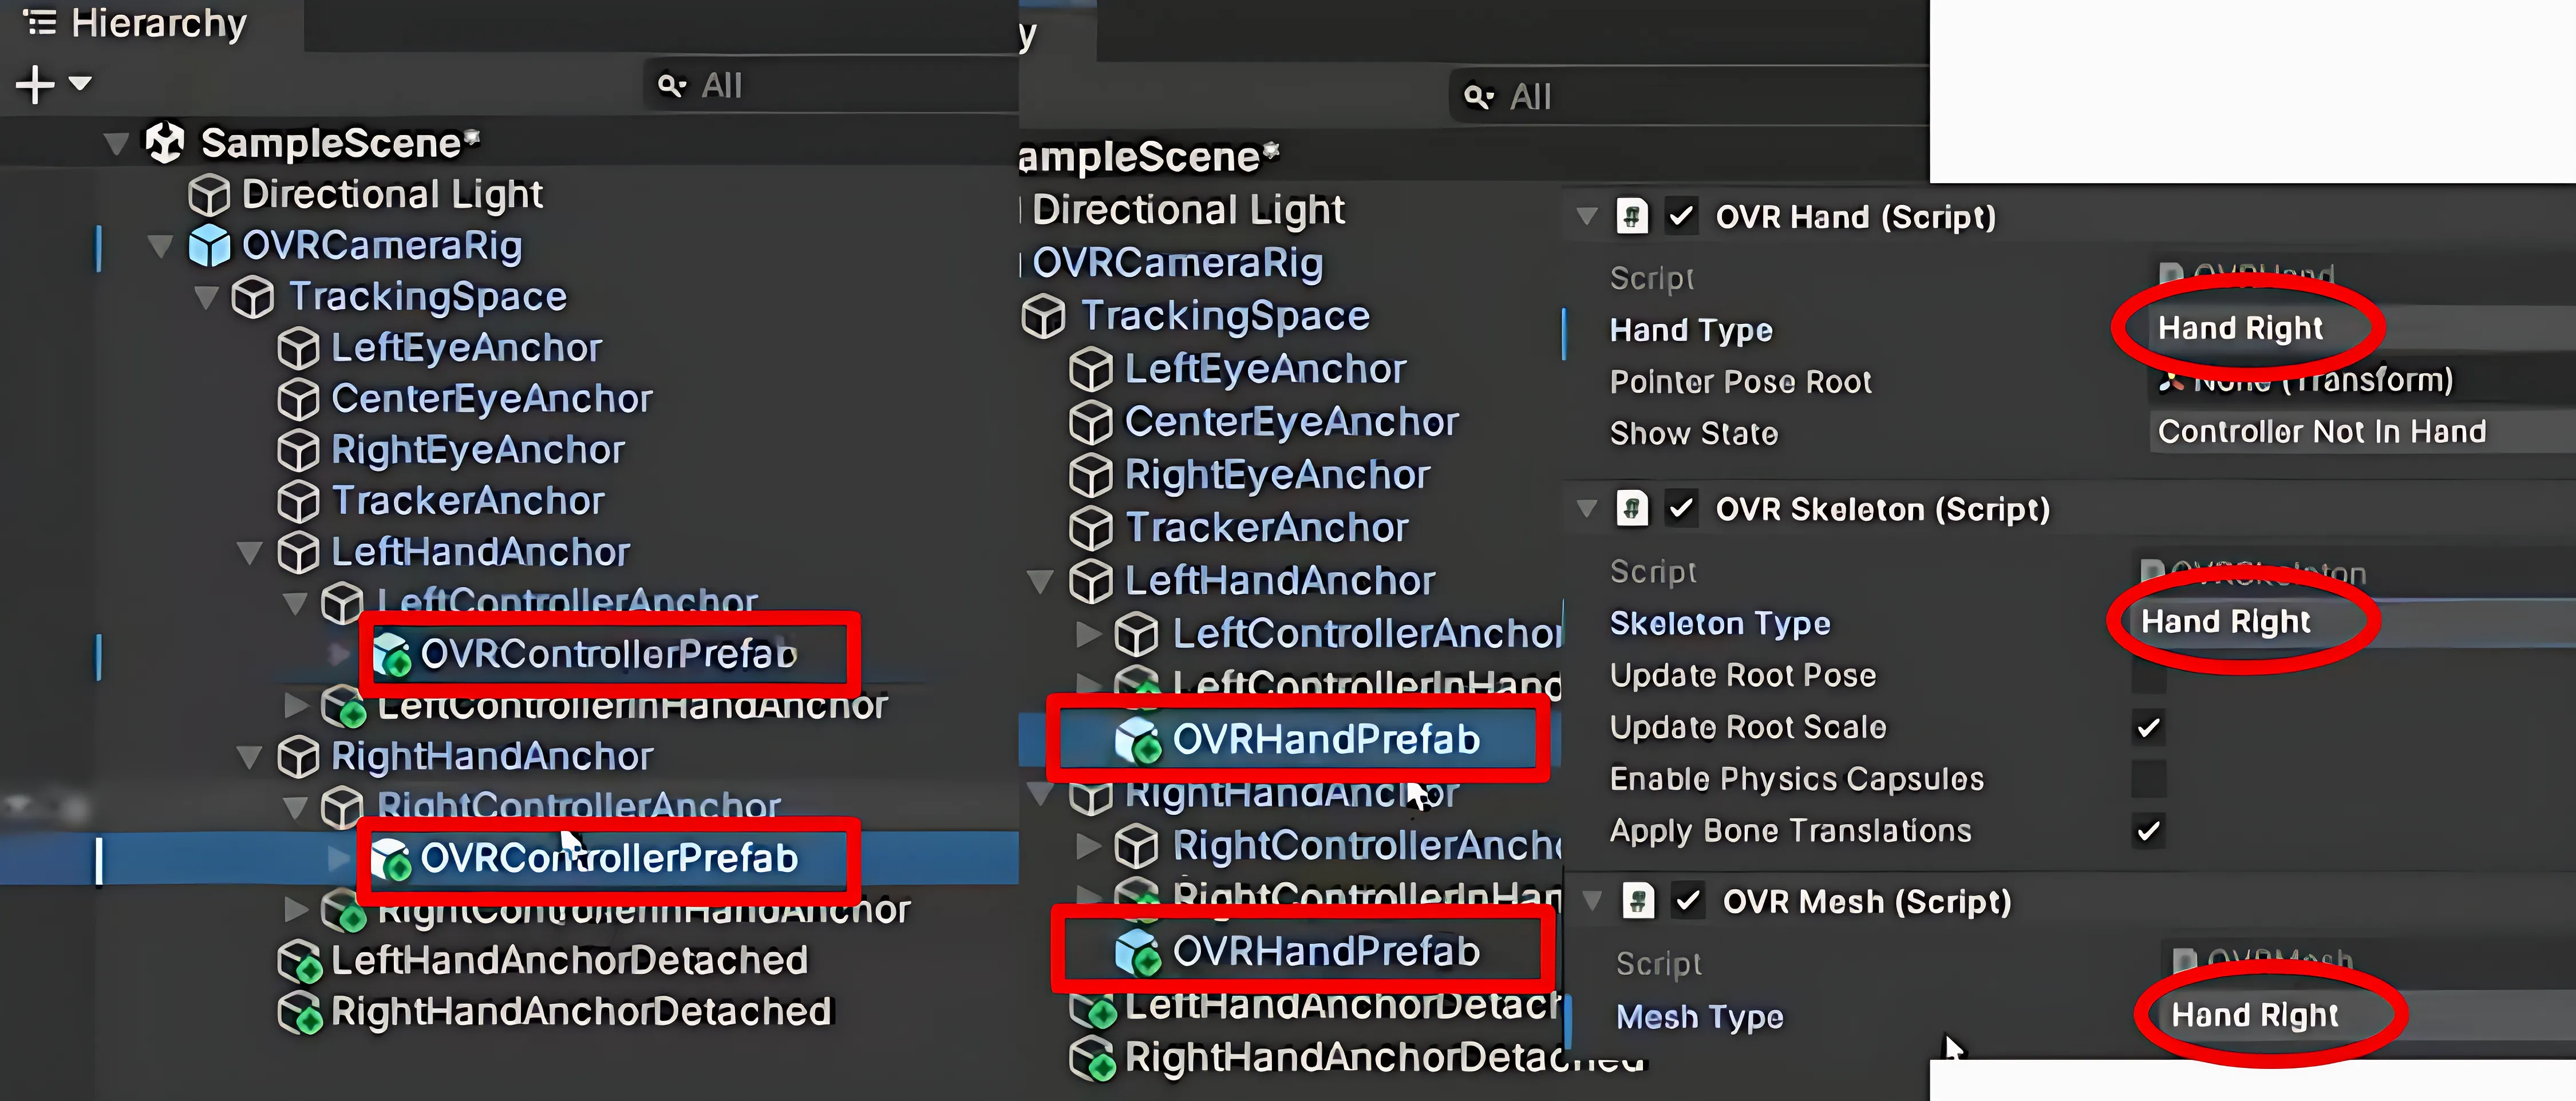
- Add
OVRControllerPrefabandOVRHandPrefabto Right/LeftHandAnchor. - For
RightHandPrefab, change to hand right in components: OVR Hand, OVR Skeleton and OVR Mesh comp.
💡 Why:
The default Main Camera does not support VR tracking or Passthrough. So we have to replce the deafault Main Camera into OVRCameraRig which handels stero rendering, tracking, and device input. Changing settings in OVRManager enables both controllers and hands in MR while turing on Passthrough. OVRControllerPrefab and OVRHandPrefab provide controller/hand models so you can actually see and interact with them in MR.
2. Adding the Passthrough Layer
- Create an empty object
Passthrough. - Reset its Transform.
- Add OVR Passthrough Layer component inside Passthrough.
- Change Placement → Underlay.
💡 Why: Underlay makes the real-world view sit behind virtual objects, avoiding weird overlaps.
- In
CenterEyeAnchor, set Clear Flags to Solid Color and backaground to black. - Create 3D object
Cubein Hierarchy and adjust the position as needed.
💡 Why: Prevents Unity’s default skybox or other background from showing through. A quick test object to confirm Passthrough + rendering are working.
Video
Scan Space
1.OVR Settings
- Add
OVRSceneManager.- Assign Plane (OVR Scene Anchor) to Plane Prefab and Volume (OVR Scene Anchor) to Volume Prefab (plane mesh & volume).
- Assign Invisible Plane (OVR Scene Anchor) to Plane Prefab and Invisible Volume (OVR Scene Anchor) to Volume Prefab (plane mesh & volume). — recommended.
- In
OVRCameraRig, change to Supported in scene support.
💡 Why:
Plane and Volume in OVRSceneManager enables scene understanding so your virtual objects can collide with real-world walls/floors. Invisible prefabs keep the real-world mesh hidden but functional. Without enabling scene support in OVRCameraRig, the headset won’t actually run scene scanning.
Video
Ball Interaction
1. Ball Interaction Script
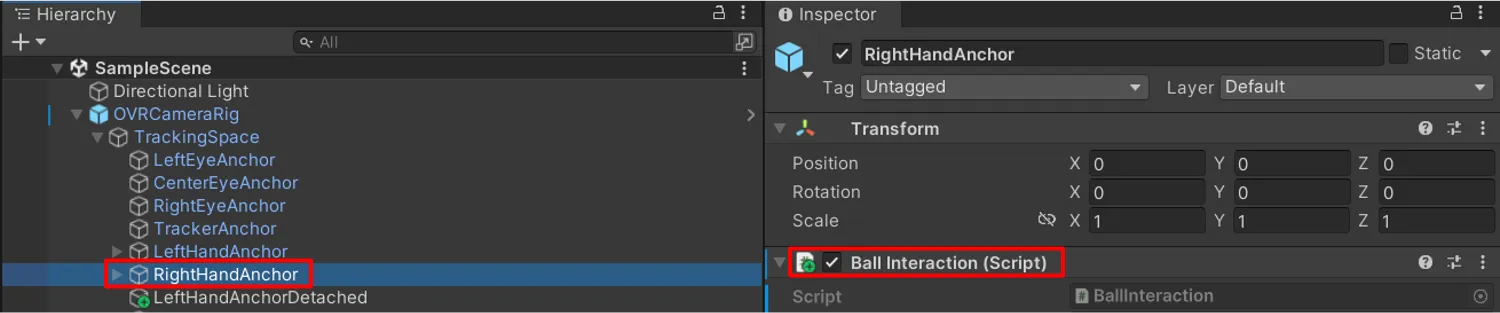
- Go
RightHandAnchor → Add Componentand create a BallInteraction component. - Copy and paste the below script.
using System.Collections;using System.Collections.Generic;using UnityEngine;
public class BallInteraction : MonoBehaviour{ public GameObject prefab; public float spawnSpeed = 5;
void Update() { if (OVRInput.GetDown(OVRInput.Button.SecondaryHandTrigger)) { GameObject Ball = Instantiate(prefab, transform.position, Quaternion.identity); Rigidbody BallRB = Ball.GetComponent<Rigidbody>(); BallRB.velocity = transform.forward * spawnSpeed; } }}💡 Why: This script lets you spawn and throw balls from your right hand trigger.
2. Physics
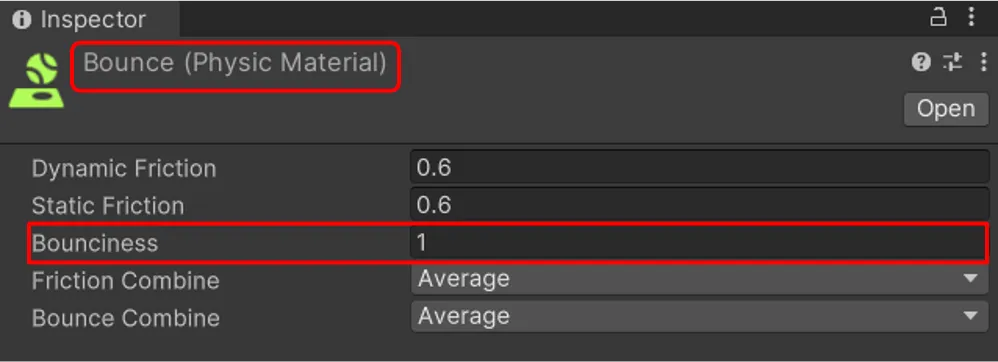
- Create a Physic Material
Bounce(Bounciness=1) in Assets folder.
- Create a 3D object sphere
Bounce Sphere(scale 0.1, 0.1, 0.1) and add Rigidbody. - Go
Bounce Sphere → Sphere Collider → Materialand assignBounce.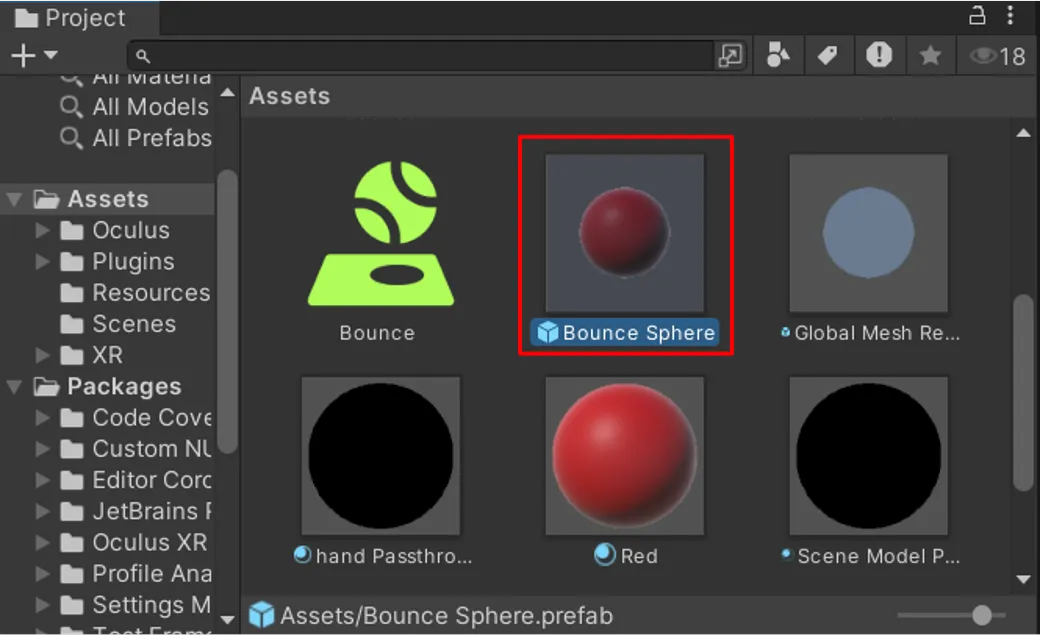
- Add
Bounce Spherein Asset folder and remove it in Sample Scene.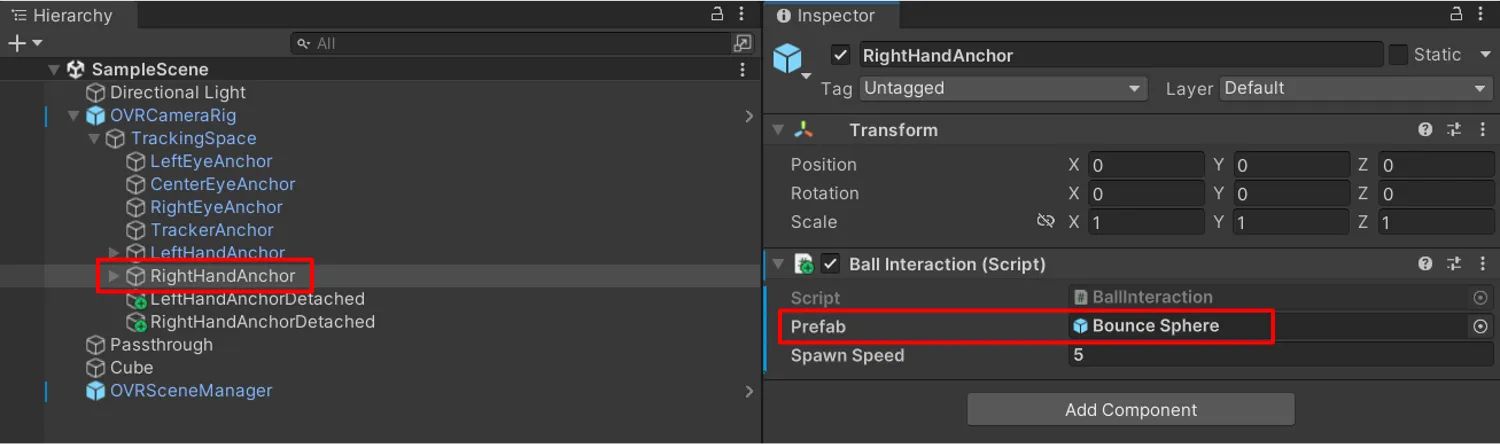
- Go
RightHandAnchor → Ball Interaction → Prefaband assignBounce Sphere.
💡 Why: The Rigidbody and Physics Material make the ball actually bounce instead of rolling lifelessly, and saving it as a prefab keeps spawning clean and reusable.
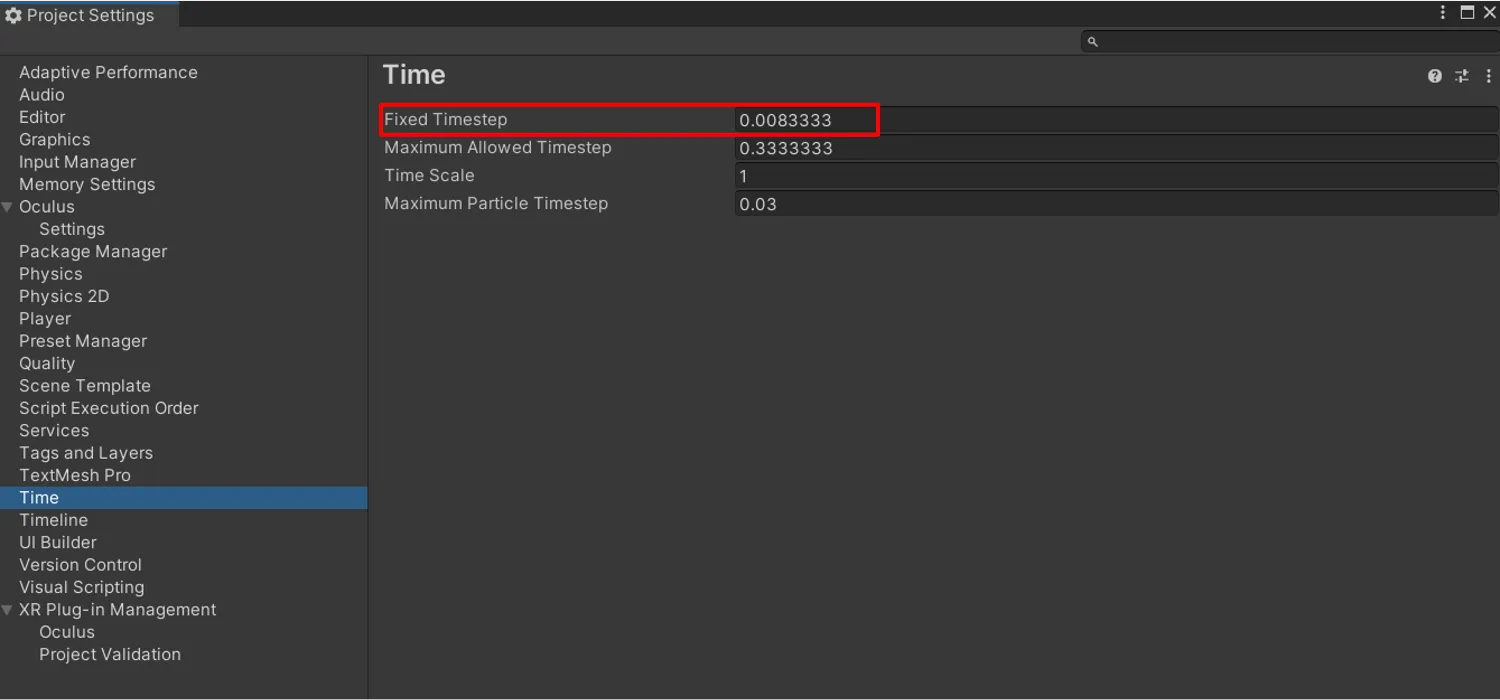
- Go
Edit → Project Settings → Timeand set Fixed TImeStep = 0.0083333.
💡 Why: Matching Unity’s physics update to 90 Hz reduces jitter in MR, and linking the prefab ensures that pressing the trigger spawns bouncy balls.
Video
Errors
- AirLink → blurry visuals, slower loads.
- USB builds → load more than 10 mins sometimes.
- Unity sometimes didn’t detect Quest if Wi-Fi was off or connected to different Wi-Fi with your computer.
Future Usage
-
Interactive Navigation Cues: Seeing balls collide with scanned walls made me think: if objects can interact reliably with meshes, you could use the same logic to overlay arrows indoors.
-
Spatial Data Visualization: Aligning balls with real surfaces highlighted the importance of accurate mesh placement. This directly extends to real-time overlays on equipment.
-
Room-Aware Game Mechanics: Physics interactions with walls suggest gameplay mechanics: your real room can become the level itself.
-
Furniture / Object Placement: Adjusting spawn positions to avoid clipping with walls/furniture revealed the potential to preview objects realistically in your own space.